The Cloth Diaper Post
So it's been since April that I've posted. I guess it's true what they say about retirement being so busy! lol I have worked on a number of projects from the garden to the garage to the sewing room that I really should have posted about. Maybe I will do a catch up post one day.
In the mean time, today has been spent in the sewing room working on cloth diapers for my daughter's first child due early in the new year. She was given some hand-me-downs from a family member and they are a whole lot more complex than what I made when she was a baby. I spent the first part of the afternoon replacing worn out elastic and velcro on the hand-me-downs which was a good opportunity to see how commercial cloth diapers are put together. Then I spent a crazy amount of time making my first prototype - the million dollar diaper based on how long it took me to put this together! lol The pattern I had bought was for a pocket diaper but it turns out she prefers the ones with a snap in soaker. To be fair I didn't realize it was a pocket diaper pattern when I bought it but I figured I could make this pattern work. I used the size small and it turned out to be the same size as the all-size diapers I had just repaired. So instead of making diapers in all the different sizes I added adjustment snaps and we will play it by ear. I can always make bigger ones down the road if needed. The snaps and applicator tool are very expensive so I buy them when my local fabric store has its 50% off sales.
 It's hard to tell in this pic but when set to the smallest size it is the same size as the name brand one underneath at it's smallest size.
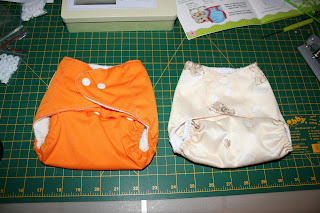 Here they are side by side.
 Same thing when set to the largest size.
 And again side by side.
 Here it is with the soaker inserted. For the soaker I used four layers of flannel and two layers of terrycloth backed by a layer of wicking waterproof fabric that I am hoping helps keep the flannel lining of the outer diaper dry.
 This final pic shows the snap (click on the pic to embigen) to attach the soaker to the diaper. Again, looking closely, you can see the wicking waterproof fabric on the back side of the soaker.
I tested that fabric to see which side needs to face out. This fabric is amazing! When you pour water on the one side the water pools, but when you pour it on the other side it completely soaks through leaving that side dry. I am tempted to use a layer of this on the side against baby's skin to keep a dry bottom but it is a plastic type of fabric so for now I am sticking with the soft goodness of flannel against sensitive newborn skin. I will have to discuss this with daughter and get her input.
Edit: I tried to recreate this experiment to show my daughter and the fabric is waterproof from both sides. As a breathable waterproof fabric it should be perfect for backing the soakers but would not be appropriate as the layer against baby's skin.
I've got about 4 months or so to get this project done, but I know that will fly by with all the other projects and hobbies singing their siren songs.
In the mean time, today has been spent in the sewing room working on cloth diapers for my daughter's first child due early in the new year. She was given some hand-me-downs from a family member and they are a whole lot more complex than what I made when she was a baby. I spent the first part of the afternoon replacing worn out elastic and velcro on the hand-me-downs which was a good opportunity to see how commercial cloth diapers are put together. Then I spent a crazy amount of time making my first prototype - the million dollar diaper based on how long it took me to put this together! lol The pattern I had bought was for a pocket diaper but it turns out she prefers the ones with a snap in soaker. To be fair I didn't realize it was a pocket diaper pattern when I bought it but I figured I could make this pattern work. I used the size small and it turned out to be the same size as the all-size diapers I had just repaired. So instead of making diapers in all the different sizes I added adjustment snaps and we will play it by ear. I can always make bigger ones down the road if needed. The snaps and applicator tool are very expensive so I buy them when my local fabric store has its 50% off sales.


I tested that fabric to see which side needs to face out. This fabric is amazing! When you pour water on the one side the water pools, but when you pour it on the other side it completely soaks through leaving that side dry. I am tempted to use a layer of this on the side against baby's skin to keep a dry bottom but it is a plastic type of fabric so for now I am sticking with the soft goodness of flannel against sensitive newborn skin. I will have to discuss this with daughter and get her input.
Edit: I tried to recreate this experiment to show my daughter and the fabric is waterproof from both sides. As a breathable waterproof fabric it should be perfect for backing the soakers but would not be appropriate as the layer against baby's skin.
I've got about 4 months or so to get this project done, but I know that will fly by with all the other projects and hobbies singing their siren songs.
 |
| Tell me that isn't adorable! |


Comments